Wednesday, February 29, 2012

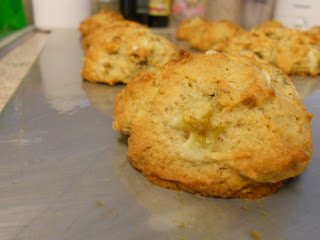
Day 26: Blueberry Muffin Top Cookies by Theresa Gill

Today's guest blogger is my cousin, Theresa. Theresa is one of those people you can't help but want to be around. I first mentioned her a few weeks back when we signed up for the Chicago Marathon. Theresa is a busy mom of two absolutely adorable kids. One of my few older cousins,  I have always looked up to her. I have loved being able to grow up with her. She is inspiring, thoughtful and really really funny. There are times we still giggle like we are 10 when we get together :)

With our cousin Andrea (middle) going to see the Mega 80's!


Theresa's cookie will be the perfect solution to busy mornings! I am going to make a bunch of these and freeze them. Enjoy!
 *********************


Top of the Muffin (Cookie) to YOU!!!


When my cousin Stephanie asked me to be a "guest blogger" I was a little worried. After all, my baking skills don't go much further than the Chocolate Chip Nestle Tollhouse Recipe. I also make a mean Oatmeal Raisin every once in a while, but how boring is that?

My daughter, Katherine, started Kindergarten this year. Each morning is a whirlwind of getting dressed, brushing teeth, and eating breakfast. The other morning I had my famous chocolate cookies sitting on the counter and that's exactly what Katherine wanted at 7am. I'm sure every parent has experienced these exhausting mornings. After debating with my very persistent 5 year old for 10 minutes about how eating cookies for breakfast is "not healthy" or a "good start to the day", she finally gave in with tears running down her cheeks and had a bowl of Frosted Flakes...Just kidding. No sugar cereal over here just a good old fashion bowl of Cheerios.


Then the idea came to me...A breakfast cookie!! Well, after googling "breakfast cookie" I found I wasn't the only one with this idea. In fact, there were millions of recipes. I started to search and most of them looked, well, just pretty gross (and okay, maybe a little complicated). HMMM....I proceeded to google blueberry muffins and then I saw the ray of light...Blueberry Muffin Cookies. I found a few recipes and came across one that looked simple and tasty. Better yet, they were called "Blueberry Muffin Top Cookies" and I immediately thought of an episode from one of my favorite all time shows, Seinfeld..


Blueberry Muffin Top Cookies


2 cups flour
2 teaspoons baking powder

1/2 teaspoon salt
1/2 cup salted butter, softened
1 cup sugar
1 egg
1/3 cup milk
1 teaspoon almond extract
2 teaspoon lemon zest, about 1 lemon
1 cup frozen blueberries, thawed and drained


1. Preheat oven to 375 degrees. Combine flour, baking powder, and salt in a bowl, set aside.
2. In the bowl of your mixer, cream together butter and sugar until well combined. Add in egg and beat until combined. Add milk, almond extract and lemon zest then beat until combined.


3. Slowly add dry ingredients into the wet ingredients, and mix until combined. Gently fold in blueberries. The dough will seem too thick, but just keep at it!


4. Refrigerate the dough for at least one hour, then shape into large balls. Bake 6 to a baking sheet for 13-15 minutes, or until slightly golden brown on the bottom, and set on top. Do not overbake, Let cool on the baking sheet for 5 minutes, then transfer to a cooling rack to cool all the way.


Katherine: YUMMMMM!! TASTY!!
The Cookies were delicious. So good that I had 3 myself (It's a good thing I'm just a guest blogger). The lemon zest is what gave it superb flavor. They tasted exactly like a blueberry muffin top. I'm excited to try different variations such as adding oatmeal, applesauce, orange zest, flax seeds, etc. TOP OF THE MUFFIN-COOKIE TO YOU!!!!


Sunday, February 26, 2012

Day 25: Classic Peanut Butter Cookies with Reece's Pieces by Leann Marosi

Today my guest blogger is my brother's girlfriend Leann. However just calling her his girlfriend doesn't seem fair, she is a special part of our family and the boys all think of her as their aunt. A perfect match for my brother, we see the two of them sharing a long happy life together. She is smart, beautiful and brings out the best in everyone around her. We are so grateful Louis found such a wonderful girl. We just love her to pieces!!!


The cookies Leann baked look so delicious!!! Enjoy!!!

*******************************

I would like to think of myself as a master chef and expert baker; however the reality is quite the opposite. My parents were good cooks and baked well, their family backgrounds providing an eclectic mix of cooking styles and recipes. As a child I was often off in my own little world, and never quite learned as much in the kitchen as I should have from them. Over the years I have become a pretty decent cook, but my baking skills are far from where I would like them to be.

Growing up I remember helping my parents bake fairly often. Sugar cookies in the shape of Christmas trees and stars, homemade frosting, butter ball cookies, and sour cream cookies sprinkled with cinnamon are what I remember most around Christmas. In the fall my dad used to make apple pie after we went to Hy’s Apple Orchard and picked our own apples. Unfortunately being a helper to my parents never translated into a grand culinary skill for me as an adult. I do not like chocolate or sweets of any kind, and I think that’s played a part in my lack of baking skills. Baking seems like it would be so much more enjoyable if you enjoy eating the finished product!

The first time I made peanut butter cookies as an adult, I made them for my boyfriend Louis. After a discussion about making cookies, I tried to prove to him that I could bake well. The finished product turned out to be what he still calls "football cakes" to this day. I didn’t know how much cookie dough should go into each cookie. When they came out of the oven they were huge – and oddly enough were shaped like footballs. How that happened I will never know. Fortunately after that I have managed to get much better.

Peanut butter cookies are always a hit in my house; I won't eat them, but Louis sure will! Originally I wanted to try something I had never made before. I hardly ever bake, so when I actually do, I try to do something different each time. Louis loves Dr. Pepper, so I thought that could be fun. The experiment was a complete failure. I think the recipe I was going off of was missing a few ingredients, or the measurements were wrong. They wound up tasting like cardboard; not even mini chocolate chips could save them. So much for trying something new! Based on the remaining ingredients I had in the house, peanut butter cookies turned out to be my only other option. If you don’t really love peanut butter, it may be best to leave out the Reece’s Pieces I added in.


Classic Peanut Butter Cookies (with Reece’s Pieces)


½ cup sugar
½ cup packed brown sugar
½ cup butter, room temperature
½ cup peanut butter
1 egg
1 ¼ cup flour
¾ teaspoon baking soda
½ teaspoon baking powder
¼ teaspoon salt

Beat the butter until creamy. Add the sugars and beat for two more minutes.
Mix in the peanut butter and egg. Mix together the dry ingredients – flour, baking soda, baking powder, and salt.
Stir the dry ingredients into the sugar and butter mixture. Add in Reece’s Pieces if desired. Refrigerate dough for 30 minutes.
Preheat oven to 375. Shape dough into 1 inch balls and place about three inches apart on ungreased cookie sheet. Flatten in a criss-cross pattern with a fork. Bake until light brown – about ten minutes. Cool on baking sheets for a minute; transfer to rack to cool completely.


Saturday, February 25, 2012

Day 24: Crunchy Chocolate Peanut Butter Stacks by Alexia Jackson

Today my special guest blogger is Alexia. Married to my cousin Jeremy, Lexi fits right in with our family and that is not an easy task. As I mentioned before we have a large family, meeting us for the first time had to be incredibly intimidating. That could be why she mistakenly told me her name was Michelle the first time I met her. She immediately laughed and still jokes about that moment today (see how awesome she is)!


Lexi is beautiful, loving and super fun to hang out with. She also took time out of her busy schedule to make this treat and blog about it.  I am so excited for her and Jeremy as they get ready to welcome their first child. They are going to make great parents:)


************************


Snips, snails and puppy dog tails…


Or should I say sugar and spice and everything nice? If you might have guessed I have babies on the brain. My name is Alexia and I not only Stephanie’s cousin and guest blogger today, I am also 35 weeks pregnant!  This is my first pregnancy and we are so excited to be welcoming this little surprise into our family in the next month.


During this pregnancy I have had a sweet tooth like you wouldn’t believe.  I am always looking for something chocolate in my kitchen and was so excited when I came across this three-recipe cookie on Pintrest.  It’s so simple and easy and I can whip it up after a long day of teaching, not to mention this might be a good recipe to keep handy when I don’t have much time with little one coming.


                                                       Crunchy Chocolate Peanut Butter Stacks


1 ½ cups chocolate chips
1/2 cup of creamy peanut butter
3 cups Corn Flakes cereal – I actually used the Kellogg’s fruit and yogurt corn flakes.  Sounds healthier, right?


Instructions

Place chocolate chips in a microwave-safe bowl. Microwave for 30 seconds and stir.  I did this for two cycles.


Add peanut butter and stir until well combined.


Fold in Corn Flakes until the flakes are evenly coated.


Using an ice cream scooper I dropped the mix onto a wax lined baking sheet.


Throw them in the freezer for 20 minutes and enjoy!

Thursday, February 23, 2012

Day 23: Banana Walnut Cookies by Anna Lankin

Our next guest blogger is my cousin, Anna. Anna and her sister, Jenny, were the first to introduce me to the term:  Om Nom Nom. When I first saw that comment on facebook I was perplexed. What the heck were they talking about?! Then I said it out loud and it clicked, If you don't believe me, try it!!
My little (and I say that in the most endearing way) cousin has grown up to be a smart, beautiful young lady who is currently finishing her last semester at Oakland University.

This picture was taken at my high school graduation party.
Anna, Stephanie and Jenny


I am so happy that Anna shares my love for baking delicious treats....Om Nom Nom....Enjoy!!!


***************


One of my favorite snacks is banana bread, so I thought why not make them into a cookie! I also wanted to make something I haven't heard of before.  Everyone was curious as to how they would taste, and they are just like banana bread, but in a cookie form.
I took the base of the recipe from SimpleRecipes.com I just made a few changes.


Banana Walnut Cookies
(adapted from Banana Cookies on SimpleRecipies.com)

1/2 cup unsalted butter, room temp.
3/4 cup granulated sugar
1/4 cup brown sugar
1 egg
1 cup banana (about 2 1/2 large bananas; can be mashed or cut)
1 tsp baking soda
2 cups flour
pinch of salt
1/2 tsp ground cinnamon
1 cup of nuts (I used walnuts)
Preheat oven to 350 degrees
In a medium bowl mix the butter, the granulated sugar, and the brown sugar together.


Then slowly add the egg and mix until fluffy.
In a separate smaller bowl, mix the bananas and baking soda.
In a large bowl, mix four, salt, and cinnamon.
Sift the four mixture into the butter mix.
Add banana mix.
Fold in the nuts
Bake for 11-13 minutes, or until brown (depending on the size of the cookie you make)


My two roommates and boyfriend's comment:
Jenny: Om nom nom!!!
Tammy: Fantastic!
Brian: I want more!!

Not only was I excited, but so was my roommate Tammy. Once I told her I was going to do this, she volunteered to be the first taste tester. I actually had to make a double batch so my parents could have some too :] I really enjoyed doing this!!

Tuesday, February 21, 2012

Day 22: Dulce De Leche Cookies by Michelle Giroux

The first COD (Cookie Of the Day) guest blogger is my cousin, Michelle. Michelle is as caring as they come. A kindergarten teacher currently due any day with her second child, she took time out of her busy schedule to bake these delicious cookies. Michelle has one of those infectious laughs and you cannot help but have a wonderful time when you are with her. Below is a picture of Michelle, Theresa (future guest blogger and just as awesome) and me at our cousin's wedding along with our husbands.

Kevin and Theresa, Stephanie and Adam, and David and Michelle :)


I hope you enjoy her blog as much as I did!!!
***********

This summer my brother went to visit his girlfriend Barbara and her family in Brazil.  He had a wonderful time meeting her family, seeing the beautiful sights of Brazil, and enjoying the great food of Brazil, especially the sweets.  A favorite in Brazil is a spread called dulce de leche.  In Brazil people put dulce de leche on fruit, ice cream, anything you want to add a little sweetness.  David brought this traditional treat back with him as a gift from Barbara’s family. 

When Barbara came to visit us in Michigan, I wanted to make something to share with her that would bring her a little closer to home.  This recipe was found in the food section of the Detroit Free Press.  They are really easy to make.  The spread in the middle, dulce de leche, can be found in the baking or ethnic aisle of most grocery stores (unless your lucky enough to know a great family in Brazil!)


 Dulce De Leche Cookies
(recipe from the Detroit Free Press)


¾ cup unsalted butter, softened
1 cup sugar
¾ cup Dutch process cocoa powder
1 tsp cinnamon
¼ tsp salt
1 egg
1 ½ tsp vanilla
1 ¼ cup all-purpose flour
1 can (13.4 ounces) dulce de leche


Beat butter with a mixer on high for 30 seconds.
Add sugar, cocoa powder, cinnamon and salt.


Beat in egg and vanilla.  Slowly add flour.
Divide the dough in half, cover and chill for 1 hour or until dough is easy to handle.


Shape each half into cylinder about 2 inches in diameter.  Wrap each cylinder separately and chill for 4 hours (or until firm enough to slice). 


Preheat oven to 325 , line baking sheet with parchment paper


Cut rolls into ¼ inch slices.  Place 1 inch apart of baking sheets.  Bake 12-14 min or until the edges are firm.  Cool for 2 min on baking sheet, then on wire rack until completely cooled. 


Spread the dulce de leche on one side of half of the cookies.  Top with the remaining cookies, pressing together lightly to make a sandwich. 


Thursday, February 16, 2012

We are going to Disney World!

Making cookies has become a part of our daily routine. On Sunday we create our cookie menu and shop for all the necessary ingredients. Each morning I take out a stick of butter (since almost every cookie recipe calls for the butter to be softened). And the first question the boys ask me when I pick them up from school is "What is the cookie of the day?"

We are currently having a blast (let's see what I'm saying on day 200)!
There are few things at this point that could prevent me from making the COD. This reason may be the best of all...we are going to DISNEY WORLD!!!

Back in December a good friend mentioned that his parent's time share in Orladno was available through the end of February. Adam and I have been talking about taking the kids to Disney for the past few years. This was an oppertuinity to good to pass up.

We told the boys over Christmas break, however we didn't make it easy for them. We wrote out "We are going to Disney World" on separate pieces of paper, put the pieces in a bag, dumped them on the dining table and told them to figure out the puzzle.
What we got was a good hour of entertainment as they created different words. In a matter of minutes they put together 'we are going to' but it took a while wo get the rest.  See for yourself their reaction once the puzzle was figured out.


Since I knew we would be gone for 10 days I asked my family if they would be interested in becoming guest bloggers while we were away. Lucky for me (and you!) they were excited to 
help!! I cannot wait to share a little about these wonderful women and their delicious cookie recipes!!!


Wednesday, February 15, 2012

Day 21: Lemon Poppyseed Biscotti

When I think of making anything with poppy seeds I always get a little chuckle thinking about Elaine on Seinfeld and her poppy seed issue. She eats poppy seed muffins for breakfast and then ends up failing a drug test. She has no idea why she is failing the drug screen. She then tells the waitress at the coffee shop (while eating a lemon poppy seed muffin) and another customer chimes in informing her that it's the poppy seeds that are causing her to fail. This poppy seed concept even inspired a Mythbusters episode!


I was lucky enough to spend the day with my grandpa and decided to make a version of grandma's lemon poppy seed biscotti. I didn't have her exact recipe, so I adapted this one from day twenty's Cherry Chocolate Biscotti. I had my camera with me, but unfortunatly the battery was low and I didn't get great pictures of the cookies. There was just enough juice left in the battery to catch one (great) shot of grandpa, tho!


Lemon Poppy Seed Biscotti


3/4 Cup Sugar
1/2 Cup Butter, Softened
2 Teaspoons Almond Extract
3 Eggs
3 Cups of Flour
Juice and zest of one Lemon
2 tablespoons of Poppy Seeds
Heat oven to 350 degrees.
Lightly grease cookie sheet.
Mix together sugar and butter.
Add almond extract and eggs, blend well.
Add flour and baking powder, mix well.
Add the zest of the lemon.


Then add the juice and poppy seeds
Shape dough into two 10 inch rolls. Place rolls on a cookie sheet and flatten each to 3 inches wide..Bake for 20-25 minutes.
Remove from cookie sheet and cool for 10 minutes.
Slice rolls diagonally into 1/2 inch slices.
Place cut side down on the cookie sheet.
Bake 5 minutes or until bottom is brown.
Flip the cookie over and bake an additional 5 minutes.


Grandpa really loved the biscotti. He enjoyed them with a nice cold glass of orange juice :)


Tuesday, February 14, 2012

Special Valentine Project

Happy Valentine's Day!
This post is out of order, but this project is to cute not to share. When I asked Dane and Ian what they would like to give out for Valentine's Day this year I was expecting them to request SpongeBob Candy or Star Wars Cards. What they came up with was even better...Mustaches!!

They have been a fan a mustaches (who isn't!) for the past few years, and Ian has even been knows as Mustachio on occasion.

 This was Ian in Niagara Falls as Mustachio two summers ago.


Our original plan was to create a card and give each child a fake mustache. However, we came across something much better, mustache cookie cutters!!!


Dane and I got busy making the dough. I used a Martha Stewart chocolate sugar cookie recipe. We had to double the recipe, so when we turned the mixer on to cream the powered sugar and butter....oops!!! Powdered sugar everywhere!!!!


Once the cookies were made (look for the recipe after biscotti week) we attached them to a card and.....


The Mustache Cookies were a big hit!  Fun and delicious!


Saturday, February 11, 2012

Day 20: Cherry Chocolate Chip Biscotti

I have mentioned before that my Grandma Caponi was a fabulous baker. She would have something in the oven daily and she took such pride in what she was doing. As a child, the only store bought cookies I remember seeing in her home were the occasional Angel Wing (AKA Polish Chruciki)  or Keebler Fudge Striped Cookies.

She included biscotti as one of her cookie staples. So, when a friend on facebook recommended I try a biscotti cookie for this site I thought: "Yes!!"  Why just one day of biscotti??? How about a whole week!

Welcome to biscotti week!!!

To begin I picked a recipe I usually bake at Christmas time. The cherries in this biscotti always looked festive to me, and what is prettier then a tray full of biscotti???

Cherry Chocolate Biscotti
(recipe from Pillsbury Best Cookies Cookbook)


3/4 Cup Sugar
1/2 Cup Butter, Softened
2 Teaspoons Almond Extract
3 Eggs
3 Cups of Flour
1/2 Cup Chopped Candied Cherries
1/2 Cup Mini Chocolate Chips


Heat oven to 350 degrees.
Lightly grease cookie sheet.
Mix together sugar and butter.
Add almond extract and eggs, blend well.
Add flour and baking powder, mix well.
Stir in cherries (I add a little juice sometimes) and mini chocolate chips.

Shape dough into two 10 inch rolls. Place rolls on a cookie sheet and flatten each to 3 inches wide..
Bake for 20-25 minutes.
Remove from cookie sheet and cool for 10 minutes.


With a serrated knife, cut rolls diagonally into 1/2 inch slices.


Place cookies cut side down on an ungreased cookie sheet.


Bake at 350 for 8-10 minutes or until bottoms begin to brown. flip cookies over and bake an additional 5 minutes.


Remove from cookie sheet and cool on rack for 15 minutes or until completely cooled. Plate and serve.


Noah: "These are perfect with milk."
Dane: "I love them."
Ian: "Um, no thanks. I don't like cherries."